
How to set a gripper
This article is the second half of a two-part series. Don't miss our article on "Why set a gripper."
First, there are some good videos showing how to set a gripper. Any you can find on YouTube are likely worth watching. This article will cover the fundamentals for setting a gripper and explain where personal preferences can be introduced. We could have made another video, but go more in-depth here with explanations and photos. We recommend starting out with a gripper that is very easy to set.
The set outlined here is what we call a "training set." There is no goal for the set depth other than facilitating a safe and comfortable workout. With some of the hand positioning, we will encourage you to do it a certain way, which will get more comfortable with time. In other areas, we will point out where you can develop your own preferences.
Chalking your hand
Before you even pick up a gripper, you need to chalk your hand. Chalk serves to remove moisture and promote traction. In light of this, it is unwise to chalk your whole hand. During a gripper close, one handle is seated firmly in your palm while the other handle is gliding under your fingers. Chalk and gliding do not mix. Our recommendation is to heavily chalk the middle of your palm on the gripping hand, but leave your fingers chalk free.

We also recommend that you chalk your off hand at a specific joint, which you will use as the pressure point for making the set.

Specifically, the spot is just in front of where the index finger meets your hand. You will find the finger bone flares at the base and acts as a fulcrum where the gripper handle can be anchored.
Positioning the hand
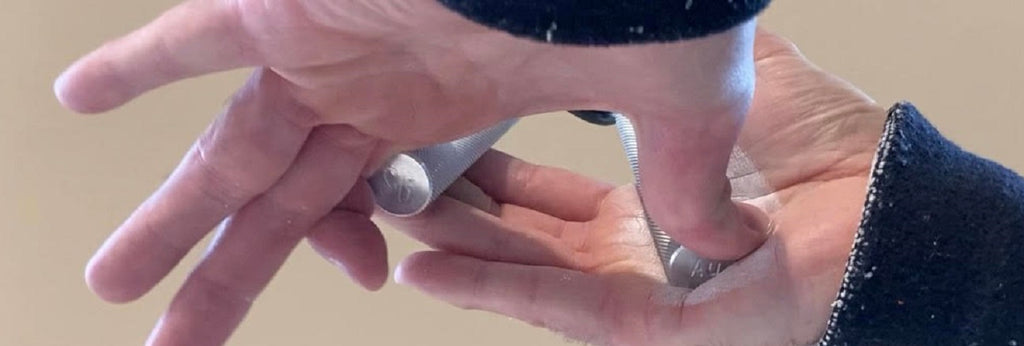
This might be the most important step and will feel the least natural to start. Closing a gripper depends greatly on a firm foundation for the palm handle. Imagine pushing a gripper closed against a couch cushion versus a wall. It's easy to see why it would be advantageous to create a wall with your palm. Here is an example:

It's tough to give cues for this motion, but here is what may help. Lightly touch the tip of your thumb to the tip of your middle finger and then tip your entire hand back at the wrist. Obviously you won't leave your thumb and middle finger touching, however starting out this way helps bring your thumb forward, which firms up your thumb pad to trap the gripper. Tipping your hand back presents the "palm wall" we are after.
Positioning the gripper
You should be able to see the foundation you have built for the gripper. Ultimately, you want the palm handle seated firmly against the "palm wall" and trapped below your thumb pad.

There are a few details at this stage that are very important:
- The palm handle should make a right angle with your pinkie. If this is not the case, straighten the handle, not your pinkie finger.
- If you have moved the handle, make sure to back fill your thumb pad and palm wall so the gripper is still seated firmly.
- The end of the palm handle should be as low as possible, but usually not below the center line of the pinkie.


How to use your off hand
Your off hand is the real workhorse of the setting process. The goal is to defer the setting effort to your off hand as much as possible. This effort is concentrated in two major parts:
- Using your off-hand thumb to brace the palm handle and apply downward pressure into your palm.
- Using the index joint you chalked earlier to push the finger handle into position, however far you desire.

Technically, the force applied by the off hand originates from your chest. It's possible to use a "pinching" motion with your off hand to set lighter grippers, but you will find this impossible as the grippers get heavier.
One way to experience this pec engagement is in the kitchen. Belly-up to the counter with a corner terminating at your left hip. Now use that same off-hand index joint to push on the corner. You should be pushing across toward the right side of your body. Since the counter is immobile, you will feel your pec firm up and you will see how the force is transferred through your wrist into the counter.
In this manner, many people are limited in their setting ability by both their chest strength and wrist strength. One exercise to strengthen this movement is called "Power Setting," which is covered later.
Putting it all together
Let's recap all the steps to setting a gripper:
- Chalk both hands properly
- Form your hand to make the "palm wall"
- Seat the gripper in the foundation at a right angle to your pinkie
- Brace the palm handle with your off-hand thumb
- Push the finger handle with your off-hand index joint to desired depth

"Power Setting" for strength training
One great way to strengthen your set is with Power Setting. Simply perform the steps above on increasingly difficult grippers. At the end of your workout, choose a challenging gripper and try to set it as deeply as possible. Focus on the mechanics of pushing with your off-hand and doing as little work as possible with the gripping hand. Make sure to engage your pecs and transfer the power through a solid wrist. Experiment with both heavy singles and "reps" as in the previous GIF.
Gripping-hand variations
We strongly encourage you to adopt the "palm wall" hand position, but there are some useful gripping-hand variations.
One common addition has the gripping hand doing more of the work to set the gripper by "finger walking" the handle as it advances. This has the benefit of shoring up insufficient off-hand setting power, but also the disadvantage of wearing out your gripping hand.

Off-hand variations
There is far more opportunity with the off hand for personal preferences. The key is to find your strengths and exploit them. If you would like to see some of these variations in action, search YouTube for gripper closes by Jonathan Vogt, Tommy Heslep, Paul Knight and Nathan Holle.
As a final thought, Paul Knight's video called "How to Set a Gripper" is a classic worth watching. It lays out many of the principles above in video format.
We can help you with your technique
If you are having trouble with your set, send us a video. Provide any link from Facebook, Instagram, YouTube, etc, and we can critique your form and give you pointers. Just send the links to info@cannonpowerworks.com.